 Writing and publishing your own eBook is a great way to make extra money to pay off debt, to add to your savings or just to spend however you like!
This is a complete guide to making money with eBooks. In this series, you’ll find out how to write an eBook that sells, how to self-publish on Amazon and how to promote your eBook to the right people so that you can start making money.
In case you missed part 1 in this series, which explored what you could write an eBook on and how much you should be writing, you can catch up here.
Today’s post will explain how to format your written ebook ready for converting into an ePub file for Amazon and how to create a top quality eCover for $5 or less.
Why self-publish on Amazon? Well, it’s the one of the biggest global marketplaces in the world for a start. You can publish your book on other platforms, but as I’ve had success with Amazon myself, I’d recommend at least starting out publishing your ebook on there.
I’ll be posting more about the royalty payment structure – how much you’ll get paid when (not if) your book sells on Amazon in a later post. In the meantime, let’s look at what needs to happen once your eBook has been written, as there are a number of steps to go through in order to get it ready for publishing.
Formatting your eBook for Amazon
1. Cross-promote your other products if applicable
eBooks are a great way to encourage your reader to visit your website if you have one, or if you have another product that you think they might like, you can promote it at the back of your eBook by adding a direct link to it. Note that Amazon don’t allow affiliate links within the content though. Use a bonus section within your eBook to promote your other products, blog or to grow your social media presence by asking them to follow you on Twitter or Facebook. Remember to ask them to leave a review for your book too!
2. Include the following sections
You’ll need a title page which states the title of your book, (this is different to the eCover which we’ll come onto shortly), a table of contents, a certain number of chapters, a conclusion and as mentioned above, a bonus section if you have one. You’ll also want to include a short copyright page somewhere, you can find lots of examples on the internet but if in doubt feel free to email me for further guidance.
How many chapters you decide on is up to you. A general rule of thumb is to create a new chapter where your eBook content takes a turn in another direction. I tend to split my ebooks, which are generally between 5,000 – 10,000 words, into 3 or 4 chapters for the main content plus an additional chapter for the conclusion and another for a bonus section.
The table of contents needs to be made up of clickable hyperlinks which will take the reader straight to a particular chapter. This involves formatting the chapter headings to the correct title tag, see below!
3. Use the correct title and heading tags
The KDP platform can identify titles and headings within your eBook providing you use the correct tags when you have your book in MS Word or Pages. This means that on a Kindle or other reading device, you can make sure your headings stand out.
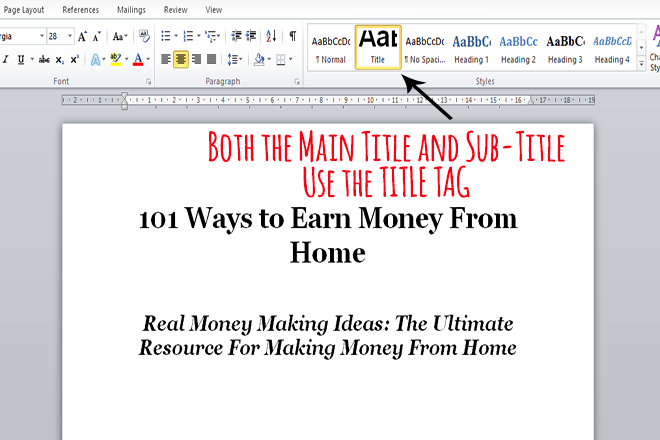
Your main page title and sub heading if you have one should be formatted to the Title tag as shown in this screenshot of one of my eBooks below.
Chapter headings should be formatted to Heading 1. This means that when you insert the table of contents, your word processing software will pick up the chapter headings and make them clickable. If you’re not sure how to create a table of contents, it’s really easy.
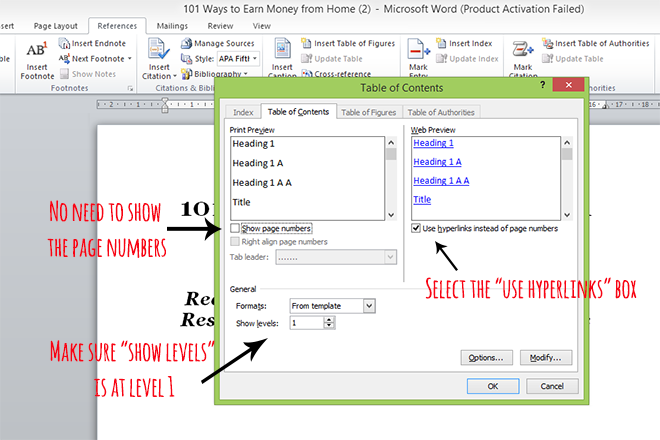
In MS Word, click on “References” in the toolbar, then click on “Table of Contents”. Scroll down the bottom of that menu and click on “Insert Table of Contents”, which will bring up a screen like this below. Make sure the level option at the bottom is set to level 1 (this means Heading 1), deselect “show page numbers” and tick the hyperlinks box. Click “OK” and your table of contents will appear, fully clickable! If you’re using Pages and not MS Word, I imagine this process is pretty similar.
4. Choose a standard font type and size
Although you might want to jazz up your eBook, it’s best to keep the font simple and clear from the start. The Kindle Direct Publishing (KDP) platform translates all fonts into basic ones anyway, so to be on the safe side use Times New Roman, Courier or Georgia. If you’re thinking of using different types of fonts to highlight key points in your book, just use italics.
5. Fully justify the main text alignment
To make your eBook easy on the eye, fully justify the text all the way through (so that it looks like a seamless block of text with no ragged edges). There’s no need to do this for the title page, as that should be centered or the table of contents page which should be left aligned.
6. Get rid of random page breaks and extra spaces
In MS Word and Pages, there is a little icon that looks like this: ![]() (the “show/hide” icon). When you click this, it will show you where you’ve made extra returns and page breaks throughout your ebook without realising. Each chapter should end with a page break and with no extra spaces or returns around it, otherwise it looks really odd on Amazon once it’s published!
(the “show/hide” icon). When you click this, it will show you where you’ve made extra returns and page breaks throughout your ebook without realising. Each chapter should end with a page break and with no extra spaces or returns around it, otherwise it looks really odd on Amazon once it’s published!
7. Compress images if applicable
If you price your book at the 70% royalty option on Amazon (which I’d recommend), you’ll be charged a delivery cost each time someone buys your ebook. The delivery cost increases in line with the file size of your ebook, meaning less money in your pocket. I tend to avoid images within the eBook for this reason as the cost can soon add up when you’re being charged 10p per MB ($0.15). However if you really want images within your eBook, you can compress your images to reduce the overall file size.
8. Check thoroughly for spelling and grammar
Once all your additions have been made and you’ve split your book into sections, check for spelling and grammar. This sounds obvious but if you’ve been slaving over your laptop for a few weeks writing your eBook, there will most likely be at least a few spelling and grammar mistakes. So read your eBook at least twice once you’re happy with it, preferably in the morning when you’re not too tired and on different days too so that you have a completely fresh perspective. Reading your book aloud to yourself is a really good way to spot mistakes that you perhaps would struggle to see otherwise.
You can always get a friend to read your eBook and if it’s particularly lengthy, you might want to consider getting a professional editor and proofreader to check your book. Your buyers will notice spelling and grammar mistakes and won’t think twice about pointing them out in a review.
Converting your eBook into an ePub file
Once you’re happy with your final eBook which you’ve formatted in MS Word or Pages, you can now convert it to an ePub file which is the most common format for eBooks. Once your eBook is converted, it’s quite tricky to change things in it as the content is then rendered in XHTML. You can of course edit your book in your standard word processing package and then reconvert it though.
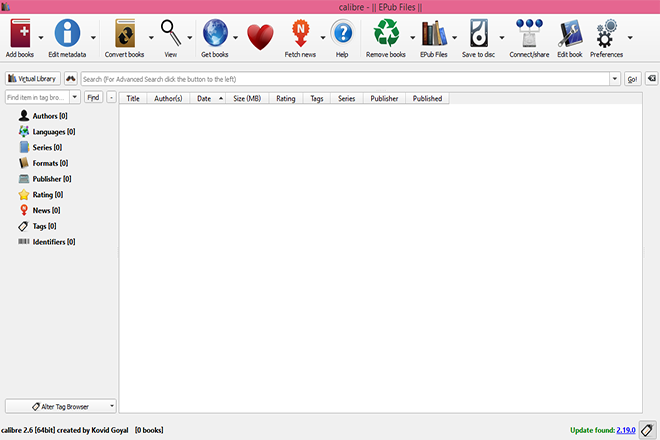
The easiest way to convert your eBook into an ePub file is by downloading some free software called Calibre. I’ve included the safe download link here – download Calibre. Once it’s downloaded, you should be able to open Calibre and see a screen that looks like this.
All you need to do is click on “Add books”, find your file and click “OK”. Then click on “Convert books”. You’ll be prompted to add an author name before it converts. Calibre automatically downloads as an ePub file to a specified location on your computer where you’ve indicated you want these files saving during the installation process. That’s it – easy peasy! The content part of your eBook will be ready for publishing on Amazon Kindle!
cCreating an eBook Cover
All eBooks need to have a cover and this is a really important of the eBook publishing process because your cover will help you to sell your eBook! There are a few ways to do this. You can have a go at creating one yourself, which I have done for a couple of my eBooks. I just looked at a few eBooks on Amazon, picked out some elements of design I liked and tried to recreate my own version of them for my eBooks in Photoshop. You can use Illustrator too if you have this installed on your computer. In terms of image size, 1700 x 2500 pixels works really well and as long as you can save it as a JPEG or TIFF file, you’ll be able to upload it on KDP.
If you don’t have access to Photoshop or Illustrator, or you feel that you’d be better off outsourcing this task, there are some really good designers on Fiverr who will create an eBook cover for you for just $5. These designers are well used to creating graphics specifically for Amazon eBooks so this is a really easy and cheap option. There is a chance you may not be happy with the result but at the end of the day, it’s $5 so it’s worth a shot right? You could also get your eBook cover designed professionally elsewhere but this will cost you.
If you’re going to outsource your cover design to a designer, make sure to be very clear with your design brief. Specify what fonts you like, what text needs to be included and provide an image. Most eBooks have images on them or some kind of graphic to make them stand out as well as clear text which states the title of the eBook.
If you’re using an image, be sure to check that you’re free to use it commerically as you could get into trouble if you don’t have permission. A great way to find images that you can use freely is by using Flickr. I source most of my images for this blog from Flickr.
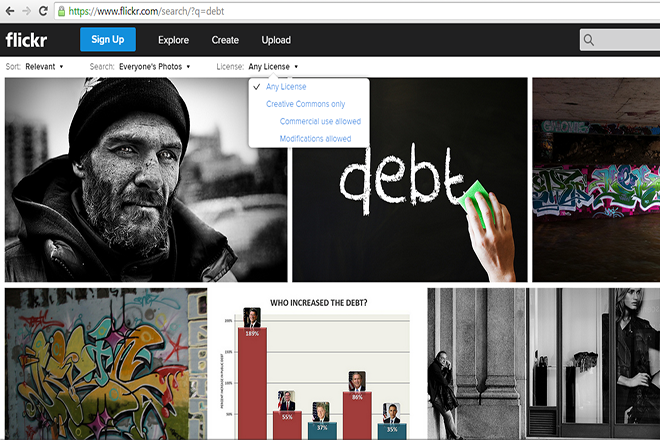
Below is a screenshot from the Flickr website. Check that you’ve selected “Creative Commons only” and “Commercial use allowed” under the “License” menu when you’re searching for any images. You’ll need to make sure to include a link to the source within your eBook – this can be slotted in nicely on the copyright page.
You can also buy an image if you can’t find something absolutely perfect that you can use for free. However, I’m all about saving money so I prefer to do this as cheaply as possible!
Quick Tip!
Before designing your cover, do a quick search on Amazon to see what other books are available that are very similar to yours in terms of the title and content. Check out the cover designs from your competition. They might be pretty standard or bland and if so, you can try to make yours brighter and better! Use the designs already on there as a benchmark so that you can make your design stand out from the crowd.
I hope you found this post helpful in getting your eBook ready for publishing on Amazon! Check out part 3 of this series where I explain how to actually publish an eBook on Amazon using the KDP platform as well as outlining how the royalty payments work and how you should determine what to charge for your book.
If you found this post useful, please take a moment to share it with your followers!
*Affiliate links are contained in this post. Disease Called Debt is a participant in the Amazon Services LLC Associates Program, an affiliate advertising program designed to provide a means for sites to earn advertising fees by advertising and linking to amazon.com.
**Image sourced from Flickr and modified by Disease Called Debt.
By subscribing, you'll receive new blog updates by email and occasionally I might email you with any exciting news. I promise not to spam you and your details will never be passed on.
20 Comments
I’m going to be working on an ebook this year so this was very helpful. Thanks for sharing this info!
Brian @ Luke1428 recently posted…How to Enjoy a Life of Guilt Free Spending
You’re welcome Brian, hopefully this series will give you lots of other pointers along the way.
Great advice – and love the detailed tutorials! Pinning this for future reference!
Gretchen recently posted…Best Amazon Deals 02/15/15
Thanks Gretchen, I’m glad you liked this post and my screenshots!
It feels like I can produce an ebook this year and I am so excited about it. Thanks for the tips!
Jayson @ Monster Piggy Bank recently posted…Focus Your Time to Produce The Best Results
You’re welcome Jayson, I’m glad this post has helped you!
I had planned to write 3 books, so far I haven’t done anything like this, since my work hours are too few and I need to accommodate my web design clients before I can work on my own projects. I’ll bookmark this article though, it will come in handy when I get the time to do my writing.
Ramona recently posted…Top Reasons Why I Don’t Have a Credit Card
That’s great – good luck with your eBooks when you get time to do them Ramona!
I’m so happy that I came across your series! I’d like to get into the eBook world and your posts make it much easier to know where to start. Thanks for the information!
Nicole recently posted…Group Projects Can Be A Good Thing…I Swear
You’re very welcome Nicole! I’m so glad this series has helped you. Good luck with your future eBooks!
Very informative post, I’ll definitely pin this just in case I want to take ideas from it once I get to start writing my own book.
Thank you so much for the tips, I am planning on starting my own e-book in the next one month and the tips you gave were very useful, I have saved your write up and will review it from time to time once I start writing.
Hi Onu! Thank you for commenting and I’m really glad you found this post useful! Good luck with your eBook. 🙂
I plan on having a few tables in my book. Would those be considered images?
Hi Elle, I’ve never used tables in any of my ebooks but I would be wary about including them because the formatting is slightly different with an eBook. What looks good in MSword for example might not look great when your book has been converted (columns may have moved etc). Whether the file size is affected really depends on how much content is in your table and whether you import it as an image or not. I would suggest steering clear of them unless you absolutely need them in there. If you do, just make sure you’ve double checked the format of your book at the publishing stage.
I loved your tip!
Chhavi recently posted…10 guaranteed ways of resolving disagreements without having a “fight”
Thank you. Your very clear & concise information helps to take most of the fear out of this whole e-book making process. It is very much appreciated. – J.M.
You’re very welcome! Glad you found this post useful. 🙂
Hey, I just wanted to say I read the first post in this series this morning and had to read this second one now. Very good! I can wait to finish the series. I am hoping to publish an ecookbook November/December of this year so, this series is great! Keep up the great post!
Thanks Rilla! I’m glad you’re finding this series useful. The other three posts have all been published now, so I hope you enjoy the rest! (The next one is linked up at the bottom of the post).