
Welcome to the third part of How to Make Money Writing and Publishing eBooks here on Disease Called Debt.
Writing and publishing your own eBook is a great way to top up your income so that you can pay off your debt faster, increase your savings or just spend on whatever you like!
This series explains how to write an eBook that sells, how to self-publish on Amazon and how to promote your eBook to the right people so that you can start making money. In case you missed the previous posts in this series, you can catch up with Part 1 (what to write about and how much to write) and Part 2 (how to format your eBook to get it ready for publishing and create an eCover) by clicking on the relevant links.
Today’s post will explain about Kindle Self Publishing – how to publish your eBook on Amazon using the Kindle Direct Publishing (KDP) platform once you have your eBook written and formatted. You’ll also need to have your eCover designed so that you’re ready to go.
Kindle self-publishing
Amazon’s KDP platform is an easy way to self-publish your eBook, cutting out the need to use a publishing agency which will save you tons of time. Kindle self-publishing also means that you’ll get to keep more of any profits made from your book (up to 70% royalties in most countries if you choose this option).
Once you’ve signed up for an account with KDP, it can take as little as 30 minutes to fill in the required forms to upload your eBook for publishing. Once you’ve done your bit, Amazon will publish your eBook usually between 24-48 hours.
Signing up for a KDP account
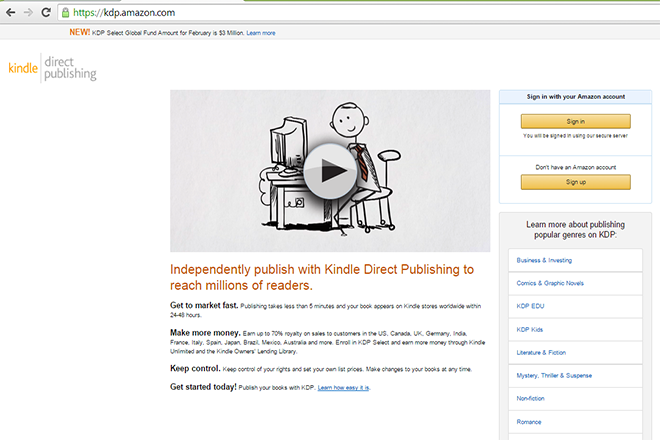
The very first step to take is sign up for a KDP account at https://kdp.amazon.com. You’ll see a screen like this below. If you’ve already got an Amazon account you can just sign in and if not, you’ll need to click “Sign up”.
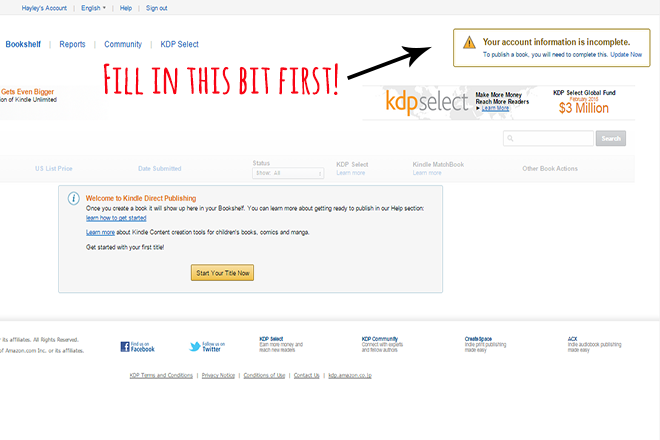
When you sign in (or sign up), you’ll see another screen that gives you various options about getting started with publishing your eBook. You’ll need to fill in some basic account information before you can go ahead and self-publish your eBook.
You’ll be asked for your contact details, your bank account information (so Amazon can pay you!) and you’ll need to go through a series of steps to verify your tax information. If you don’t complete the tax information section, some of your royalties will get withheld for tax purposes by Amazon so be sure to fill in it asap! If you live in the US, you’ll need your tax identification number. If you live outside the US, this part used to be quite confusing as an Employer Identification Number (EIN) was required, which meant jumping through a few hoops to get hold of one.
Thankfully in October 2014, this process was simplified somewhat and it’s my understanding that you now just require the tax identification number that has been issued by your own country. For fellow UK readers, this is your NI number, for Irish residents this is your PPS number. This helpful article I found on another blog will explain everything you need to know about the tax side of things and it’s much easier to follow than how the KDP platform explains it!
Self-publishing your eBook on KDP
1. Filling in the details about your eBook
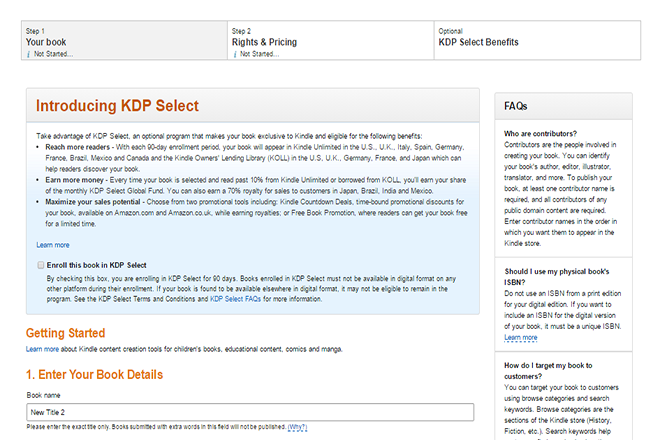
Once you’ve done all of that, you can go ahead and start publishing your eBook! You can either click on “Start Your Title Now” or simply click on “Bookshelf” and “Add New Title”. The next screen that appears will have a bunch of questions that you’ll need to answer about your ebook, starting with whether or not you want to enrol your eBook in KDP Select.
Whether you enrol your ebook in KDP Select is up to you. The benefits to KDP Select mean that you can offer your ebook on free promotion for up to 5 days (in a 90 day period). This also means your eBook will be eligible to appear in the Kindle Owner’s Lending Library (KOLL) which basically means that you’ll have a wider audience for your eBook. And you’ll earn money from those KOLL units as long as 10% of the eBook is read. The downside to KDP Select is that you can’t publish your eBook on any other platform during the time your eBook is enroled.
Once you’ve decided whether to tick the KDP Select box or not, you can start filling in your eBook details. Enter your eBook title, whether it’s part of series and then move on to the description.
Quick Tip!
Many authors don’t utilise the description field as much as they could. The description field lets you write up to 4000 characters. So write as much as possible about your ebook in this field so that you can make it stand out from the competition! The description will help you to SELL your book. You can also format your text using HTML tags for headings or use bold tags to make your text stand out.
2. Choosing categories for your eBook
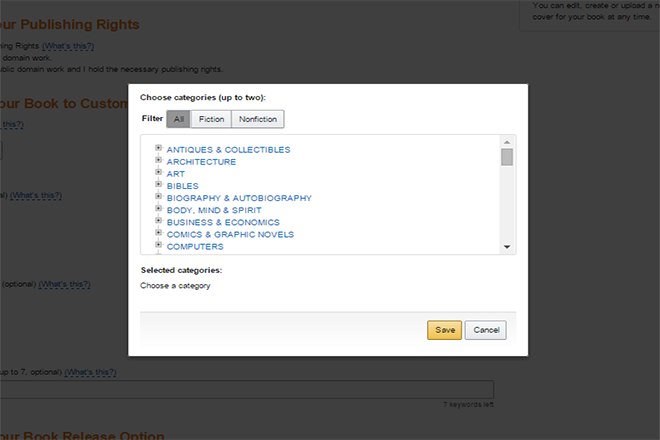
A bit further down this page is the section where you’ll need to select categories for your eBook. This bit is important because if you choose the wrong categories, your eBook won’t be targeted properly towards the right kind of buyers. KDP allows you to choose two categories for your eBook so think about where your eBook would fit best before selecting them.
3. Uploading your eBook
When you scroll down further, you’ll be prompted to upload your eBook cover and the content file. Just locate these from where they are stored on your computer and click upload. Remember to choose the ePub file for the eBook itself instead of the original Word doc for example. It may take a few minutes for your eBook to be uploaded to KDP and when it’s done, you’ll see an icon which will allow you to preview how your eBook will look on a digital reading device.
4. Setting your publishing rights and pricing details
Once you’ve uploaded your eBook, you can click on “Save and Continue” to move onto the second part of the KDP process which is about setting your publishing rights and pricing. You can select whether you want your eBook to appear in specific territories or whether you want it publishing worldwide. Selecting “Worldwide rights” will mean that your eBook will be published on all Amazon platforms globally. If you want as much exposure as possible for your eBook, select this option!
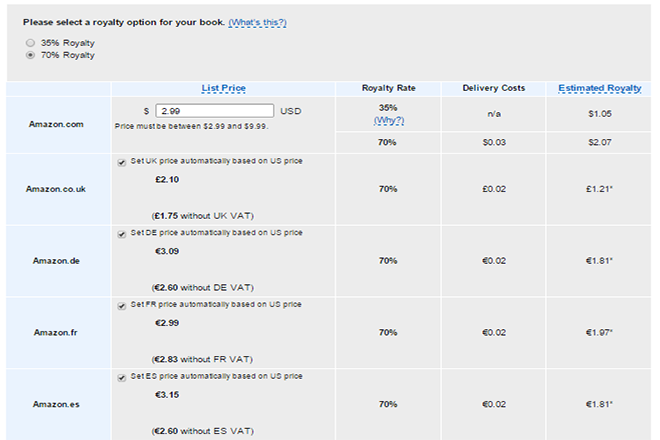
The next section is where you’ll need to set your royalty option for your eBook. You can choose a 35% or 70% royalty. Before you automatically choose 70% (who wouldn’t want a 70% royalty right?), there are pros and cons to both options.
If you select the 35% option, you can price your book at $0.99 and because it’s priced low there will be no delivery costs to worry about. The other advantage to pricing your book low is that it will encourage downloads and that in turn will help to increase your eBook’s Amazon ranking. The better your Amazon ranking, the higher up your eBook will appear in the search results when potential buyers search for a topic relating to your eBook.
If you select the 70% option, you must price your eBook between $2.99 and $9.99. With this option, you’ll pay a delivery cost each time someone buys your eBook ($0.15 / £0.10). However, you’ll get to keep more of the profit from your eBook sales. You might not get as many downloads with your eBook being priced that little bit higher.
Quick Tip!
How much would you pay for an eBook? Thinking about what you’d expect from an eBook is helpful when deciding on how to price your own eBook. It’s quite common for eBooks that are around 5000 words to be priced either at $0.99 or $2.99. If your eBook is longer or offers incredibly useful information, then you can get away with charging more. You can change the price at any time too.
With my own eBooks, I’ve used both options for my pricing strategies. When I first published my eBooks, I priced them at $0.99 (35% royalty option) and offered them on free promo to encourage downloads. Once I’d managed to get some reviews, I altered the price to $2.99 (70% royalty option) for each one.
Note: The pricing structure is set to US dollars by default on KDP. But it translates to the relevant currency when an eBook is published to other Amazon sites.
5. Publishing your eBook
Once you’ve decided on how to set your price for your eBook, that’s pretty much it. Just scroll to the bottom of the screen and there’s another couple of boxes to select (or not) before you publish. One is about enrolling in Kindle Matchbook – this basically means that if you have a print version of your eBook, you can allow customers (who’ve already bought the print version) to buy the Kindle version for $2.99 or less. If you don’t have a print version of your eBook already, you can ignore this section!
The last box to select is about whether you want to allow lending for your eBook (where buyers can lend your eBook to their friends for 14 days). I personally don’t mind buyers lending my eBooks to their friends as I figure it’s more exposure for me. But this is totally optional.
Once you’ve done that, hit “Save and Publish”! Your eBook will be published within 24-48 hours and you’ll receive a notification when it’s live although if you’re anything like me, you’ll keep checking the Amazon website every hour until that point!
I hope you’ve found this post helpful in explaining how to get started with Kindle self-publishing. Don’t forget to check out the next post in this series on how to get your eBook sales off to a great start by developing a marketing strategy so that you can promote it in all the right places – see part 4 here.
Has this post helped you? Please take a minute to share it with your social media followers!
*Affiliate links are contained in this post. Disease Called Debt is a participant in the Amazon Services LLC Associates Program, an affiliate advertising program designed to provide a means for sites to earn advertising fees by advertising and linking to amazon.com.
By subscribing, you'll receive new blog updates by email and occasionally I might email you with any exciting news. I promise not to spam you and your details will never be passed on.
14 Comments
Now on Part 3! Yes, I feel I can do it more easily and publish my own e-book! Just signed up for my own Kindle account. Thanks for your tips. It’s really guiding us step-by-step.
Jayson @ Monster Piggy Bank recently posted…Real Estate Investments: Comparing London to New York
Thanks Jayson!
Thanks for this series, Hayley! It’s been awesome. I’m working on my book right now, as you know, and this is so helpful. I’m going to use your last ebook post as a checklist to proofread my book with. 🙂
Kalen Bruce @ MoneyMiniBlog recently posted…The Ultimate Money List: 75 Must-Read Books on Personal Finance
You’re welcome Kalen! I wish you all the best with your eBook when it launches. Looking forward to reading it!
Wow! Just discovered this post. Now I’m off to find Part 1. Thank you for such an informative series.
diane @smartmoneysimplelife recently posted…3 Tips to Banish Takeout Forever
You’re welcome – thanks Diane for checking this series out!
Will definitely reference these posts as I’m in the process of converting some of my posts to an e-book. Hustle for that extra money, right?
Jay
Jay @ ThinkingWealthy.com recently posted…How Rich Are Top Income Earners?
Definitely Jay! Hope this series helps you out. Thanks for stopping by!
Great info! Thank you.
No worries, glad you found this helpful Anne!
Thank you so much for these 3 posts – I’ve just read through them all and have found them very inspiring and helpful.
I’m so glad they helped you Alex, thank you for taking the time to comment! Hope you find parts 4 and 5 just as helpful.
Hayley this will be my very first eBook ever and I thank you so much for your posts, I certainly learned a lot. I have to be honest and admit I know nothing about what program (on my Windows 7 note book) to use to start writing. Would you please explain to me what program on my Windows 7 note book computer do I go into to start the process of writing content for my eBook. Thank you Hayley.
Hi Clarene, I’m so glad you found these posts helpful! Do you have Microsoft Word? If so, that’s the best one to use, otherwise you might have WordPad on Windows 7 which is a free word processing package. You might just need to check whether you can convert Wordpad files to ePub with the (free) Calibre software I mentioned in one of the posts. I don’t see why you couldn’t, but worth checking. If you run into problems, you could write up your ebook in whatever text processor is on your notebook (even Notepad would be ok) and then make use of a free trial for Microsoft Word. Copy and paste it into there when your book is ready for converting. Hope this helps somewhat! I wish you lots of success for your eBook!